前回は、AKS 上で Dapr をセットアップしました。
次は、Azure Kubernetes Service(AKS) 上で dapr のサンプルアプリケーションを動作させてみます。(前回と同様、動作検証時の dapr は v0.2 になります。)
最終的なアーキテクチャは次の通りです。
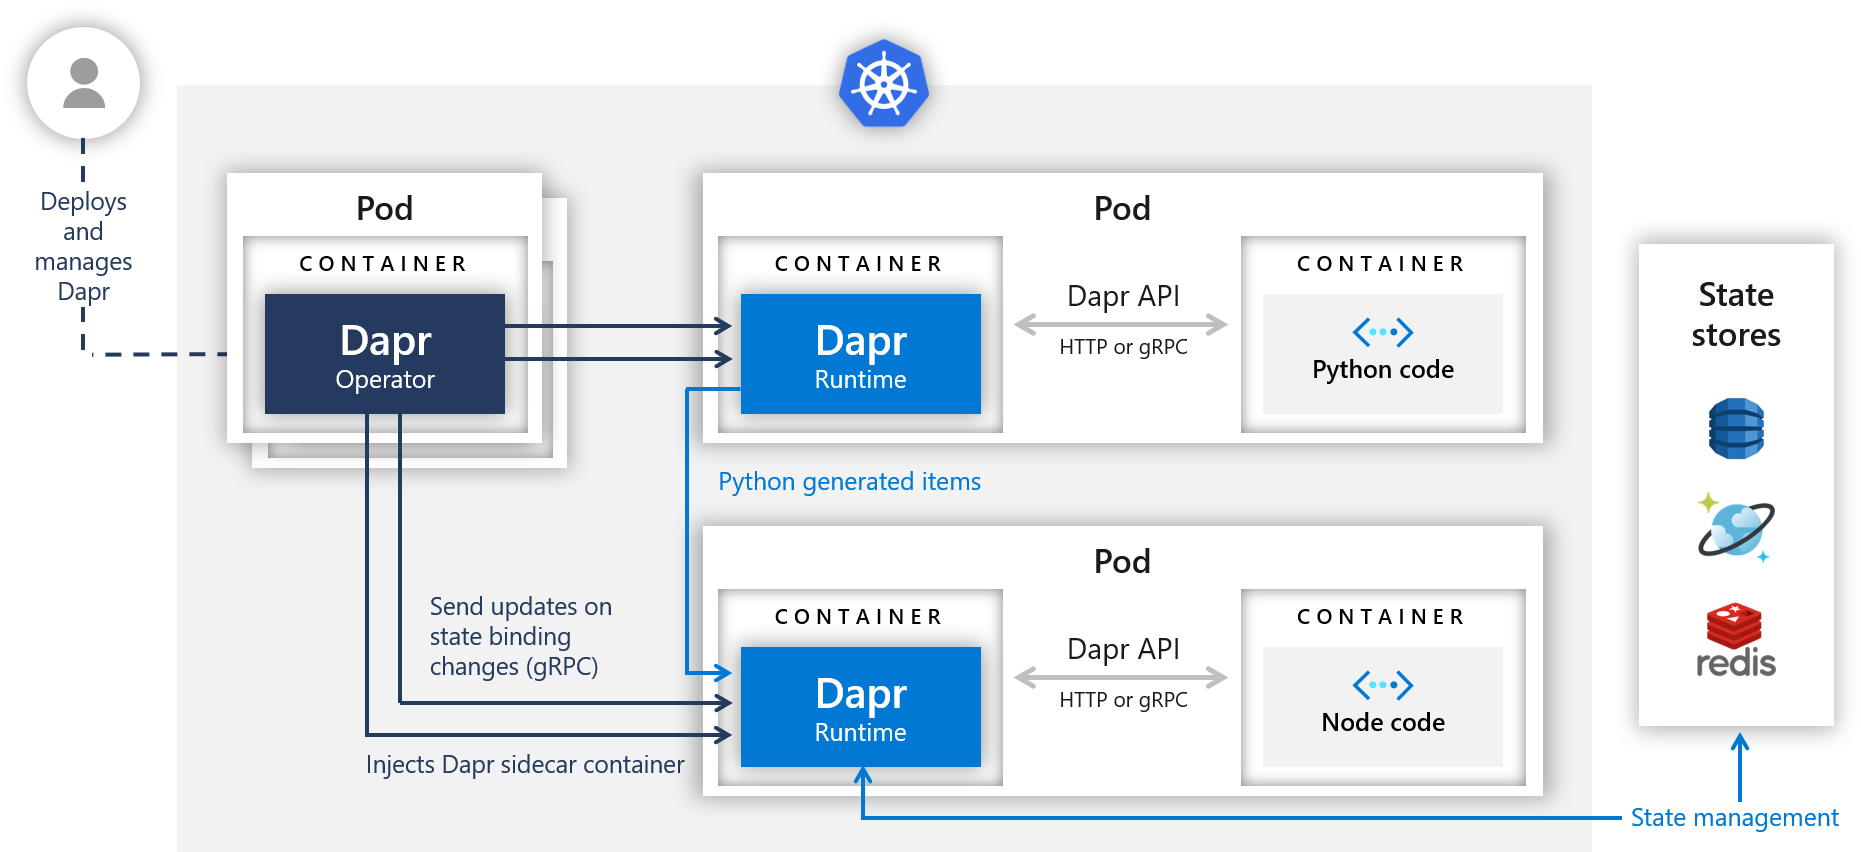
dapr がインストールされた環境で、python と node.js の POD が動作します。python と node.js の POD は、それぞれの POD 内でサイドカーとして動作する dapr API を経由して、state 情報の更新と取得が行われます。
0. ドキュメント
Hello Kubernetes
https://github.com/dapr/samples/tree/master/2.hello-kubernetes
Redis and Dapr
https://github.com/dapr/docs/blob/master/concepts/components/redis.md#configuration
1. 前提条件
Azure Kubernetes Service(AKS)で Dapr を動かす(Setup編)で、全手順を完了し、3. AKS クラスタに dapr がインストールされている状態から始めます。
2. State Store (Redis)の構築
Dapr は、Redis, CosmosDB, DynamoDB, Cassandra など様々なデータストアを state 情報のストアとして使用できます。
今回は、Redis を使用したいと思います。
今回 Redisは、Helm で作成しようと思いますので、helm をセットアップします。11月に Helm 3.0.0 が stable でリリースされたので、まずは Helm3 のセットアップから始めます。以下は Linux が作業端末であることを前提としているので、その他の環境の場合はHelm 公式を参照してください。Helm3は、Tillerless になっていたりコマンドが少し違うため、実際成功したコマンドも記載しておきます。
1
2
3
4
5
6
7
|
$curl https://raw.githubusercontent.com/helm/helm/master/scripts/get-helm-3 | bash
  % Total    % Received % Xferd  Average Speed   Time    Time     Time  Current
                                 Dload  Upload   Total   Spent    Left  Speed
100  6617  100  6617    0     0  21483      0 --:--:-- --:--:-- --:--:-- 21414
Downloading https://get.helm.sh/helm-v3.0.0-linux-amd64.tar.gz
Preparing to install helm into /usr/local/bin
helm installed into /usr/local/bin/helm
|
helm のコマンドがインストールできたら chart repository を登録しておきます。
1
2
|
$helm repo add stable https://kubernetes-charts.storage.googleapis.com/
"stable" has been added to your repositories
|
repository が参照できることを確認します。
1
2
3
4
5
6
|
$helm search repo stable
NAME                                    CHART VERSION   APP VERSION                     DESCRIPTION
stable/acs-engine-autoscaler            2.2.2           2.1.1                           DEPRECATED Scales worker nodes within agent pools
stable/aerospike                        0.3.1           v4.5.0.5                        A Helm chart for Aerospike in Kubernetes
stable/airflow                          5.1.0           1.10.4                          Airflow is a platform to programmatically autho...
# more
|
今回、redis は defaultの namespace に作成しようと思います。次のコマンドで redis をインストールします。
1
|
$ helm install redis stable/redis
|
redis がインストールされていることが確認できます。
1
2
3
4
5
6
7
8
9
|
$ helm list
NAME    NAMESPACE       REVISION        UPDATED                                 STATUS          CHART           APP VERSION
redis   default         1               2019-11-28 17:49:09.405349951 +0000 UTC deployed        redis-10.0.2    5.0.7

$ kubectl get pods -n redis
NAME             READY   STATUS              RESTARTS   AGE
redis-master-0   1/1     Running             0          6m2s
redis-slave-0    1/1     Running             0          6m2s
redis-slave-1    1/1     Running             0          5m21s
|
redis が作成できたら、次の deploy/redis.yaml を使用して redis の設定を実行します。
dapr/samples
https://github.com/dapr/samples/tree/master/2.hello-kubernetes/deploy
YOUR_REDIS_HOST_HERE, YOUR_REDIS_KEY_HERE の箇所を編集します。
 1
 2
 3
 4
 5
 6
 7
 8
 9
10
11
|
apiVersion: dapr.io/v1alpha1
kind: Component
metadata:
  name: statestore
spec:
  type: state.redis
  metadata:
  - name: redisHost
    value: redis-master:6379
  - name: redisPassword
    value: <YOUR_REDIS_KEY_HERE>
|
YOUR_REDIS_KEY_HERE については、次のコマンドで確認した値を指定します。
1
|
$ kubectl get secret redis -o jsonpath="{.data.redis-password}" | base64 --decode
|
ファイルを修正したら構成を apply します。これで一旦、redis の作業は完了です。
ちなみに redis の key は、kubernetes の Secrets にも保存できます。Sample は こちら で紹介されていました。
1
2
|
$ kubectl apply -f ./deploy/redis.yaml
component.dapr.io/statestore created
|
3. Node.js App を dapr とデプロイする
おなじく sample の deploy/node.yaml を使用します。
deploy/node.yaml を見ると Deployment の annotations で dapr サイドカーの設定が有効化されていることがわかります。
これと同時にサイドカーの dapr に対して、アプリの id や port などの情報を指定しています。
1
2
3
4
|
annotations:
        dapr.io/enabled: "true"
        dapr.io/id: "nodeapp"
        dapr.io/port: "3000"
|
デプロイします。
1
2
3
|
$ kubectl apply -f ./deploy/node.yaml
service/nodeapp created
deployment.apps/nodeapp created
|
デプロイ後、kubectl get pod で nodeapp からはじまる pod が確認できます。
1
2
3
4
|
$ kubectl get pods --selector=app=node
NAME                       READY   STATUS    RESTARTS   AGE
nodeapp-5956c68964-wfnsh   2/2     Running   0          41h
$ kubectl exec -it nodeapp-5956c68964-wfnsh /bin/ash
|
サンプルは、alpine ベースのコンテナなので、ash で接続して、node.js のコードを確認することも可能です。
 1
 2
 3
 4
 5
 6
 7
 8
 9
10
11
12
13
14
15
16
17
18
19
20
21
22
23
24
25
26
27
28
29
30
31
32
33
34
35
36
37
38
39
40
41
42
43
44
45
46
47
48
49
50
51
52
53
54
55
56
57
58
59
60
61
62
63
64
65
66
|
$ kubectl exec -it nodeapp-5956c68964-wfnsh /bin/ash
Defaulting container name to node.
Use 'kubectl describe pod/nodeapp-5956c68964-wfnsh -n default' to see all of the containers in this pod.
/app # ls
app.js             node_modules       package-lock.json  package.json
/app # cat app.js
// ------------------------------------------------------------
// Copyright (c) Microsoft Corporation.
// Licensed under the MIT License.
// ------------------------------------------------------------

const express = require('express');
const bodyParser = require('body-parser');
require('isomorphic-fetch');

const app = express();
app.use(bodyParser.json());

const daprPort = process.env.DAPR_HTTP_PORT || 3500;
const stateUrl = `http://localhost:${daprPort}/v1.0/state`;
const port = 3000;

app.get('/order', (_req, res) => {
    fetch(`${stateUrl}/order`)
        .then((response) => {
            if (!response.ok) {
                throw "Could not get state.";
            }

            return response.text();
        }).then((orders) => {
            res.send(orders);
        }).catch((error) => {
            console.log(error);
            res.status(500).send({message: error});
        });
});

app.post('/neworder', (req, res) => {
    const data = req.body.data;
    const orderId = data.orderId;
    console.log("Got a new order! Order ID: " + orderId);

    const state = [{
        key: "order",
        value: data
    }];

    fetch(stateUrl, {
        method: "POST",
        body: JSON.stringify(state),
        headers: {
            "Content-Type": "application/json"
        }
    }).then((response) => {
        if (!response.ok) {
            throw "Failed to persist state.";
        }

        console.log("Successfully persisted state.");
        res.status(200).send();
    }).catch((error) => {
        console.log(error);
        res.status(500).send({message: error});
    });
});
|
このアプリは、こちらと同じものになります。
GET /order と POST /neworder の 2つのメソッドがあり、neworder では、dapr の State management の API を利用して、リクエストで受け取った order 情報( key:order )を記録します。order では、Key:order の状態を取得しいます。
以降の作業のために、node.yaml で同じくデプロイされている service の IP を確認して環境変数にセットしておきます。
1
2
3
4
|
$ kubectl get svc nodeapp
NAME      TYPE           CLUSTER-IP    EXTERNAL-IP      PORT(S)        AGE
nodeapp   LoadBalancer   10.0.42.100   xx.xxx.xxx.xxx   80:32133/TCP   9m55s
$ export NODE_APP=$(kubectl get svc nodeapp --output 'jsonpath={.status.loadBalancer.ingress[0].ip}')
|
4. python App を dapr とデプロイする
今度は sample の /deploy/python.yaml を使用します。
1
2
|
$ kubectl apply -f ./deploy/python.yaml
deployment.apps/pythonapp created
|
デプロイ後、kubectl get pod で pythonapp からはじまる pod が確認できます。
1
2
3
|
$ kubectl get pods --selector=app=python
NAME                         READY   STATUS    RESTARTS   AGE
pythonapp-5d9649fccd-pv8x6   2/2     Running   0          42h
|
python の sample も、alpine ベースのコンテナなので、ash で接続してアプリのコードを見てみます。
 1
 2
 3
 4
 5
 6
 7
 8
 9
10
11
12
13
14
15
16
17
18
19
20
21
22
23
24
25
|
kubectl exec -it pythonapp-5d9649fccd-pv8x6 /bin/ash
/app # cat app.py
# ------------------------------------------------------------
# Copyright (c) Microsoft Corporation.
# Licensed under the MIT License.
# ------------------------------------------------------------

import time
import requests
import os

dapr_port = os.getenv("DAPR_HTTP_PORT", 3500)
dapr_url = "http://localhost:{}/v1.0/invoke/nodeapp/method/neworder".format(dapr_port)

n = 0
while True:
    n += 1
    message = {"data": {"orderId": n}}

    try:
        response = requests.post(dapr_url, json=message)
    except Exception as e:
        print(e)

    time.sleep(1)
|
このアプリは非常にシンプルです。1 秒毎にサイドカーの dapr のエンドポイント対して、次の HTTP REQUEST を POST しています。
この時、Node.js の アプリケーションの ID と neworder のメソッドを指定することで、dapr 経由で nodeapp のサービスを call しているということになります。
1
|
POST http://localhost:<daprPort>/v1.0/invoke/<appId>/method/<method-name>
|
Service Invocation
5. メッセージログを確認する
Node.js App のログを次のコマンドで確認してみます。
kubectl logs --selector=app=node -c node
そうすると、1 秒毎に Order 情報が更新されているメッセージが確認できるかと思います。
Got a new order! Order ID: 1
Successfully persisted state.
Got a new order! Order ID: 2
Successfully persisted state.
Got a new order! Order ID: 3
Successfully persisted state.
Got a new order! Order ID: 4
Successfully persisted state.
Got a new order! Order ID: 5
Successfully persisted state.
6. アプリケーションからの応答を確認する
Node.js の GET エンドポイントに接続すると最新の order の状態(orderId)が確認できます。
1
2
|
$ curl $NODE_APP/order
{"orderId":72}
|
7. あとしまつ
/deploy のディレクトリに移動して次を実行することで、AKS 上のリソースを削除します。
8. 補足
手順 5, 6 で正常な値が取れない場合、dapr の設定などがおかしい可能性があります。
その際は、nodeapp の POD 内の daprd のログなどを見るとどのようなエラーが発生しているかわかると思います。
1
|
kubectl logs nodeapp-5956c68964-wfnsh -c daprd
|